
Create new sheets using pre-defined sheet templates or clone existing sheets. A sheet list preview also displays all sheets in your model. Step 1 - Sheet Templates Step 2 - Create Sheets
Table of Contents
- Getting Started Video
- Setting Up Sheet Templates
2.1- Sheet Names & Sheet Numbers - Sheet Templates
3.1- Sheet Template Files
3.2- Saving Sheet Templates to a Revit Project File
4.3- Sheet Size
3.4- Sheet Type
3.5- Views
3.6- Adding Views
3.7- Locations
3.8- Removing Views - Using the Sheet Creator Tool
4.1- Step 1 - Select Sheet Templates
4.2- Step 2 - Create Sheets
4.3- Sheet Name
4.4- Add Sheets
4.5- Quantity
4.6- Renaming Sheets
4.7- Sheet Numbers
4.8- New Sheets Quantity
4.9- Reset Sheet Numbers
4.10- Add Sheets to Sheet List Preview as Proposed Sheets
4.11- Returning to Step 1 - United States National CAD Standards (NCS) Sheet Naming
1. Getting Started Video
2. Setting Up Sheet Templates
Sheet Creator requires Sheet Templates are created first. These can be created in Settings or they can be created as the first step of the Sheet Creator tool. Both places are identical.
Sheet Templates uses the Sheets settings on the Project tab as the default sheet numbers.

Click on the Settings button.
The Settings window opens to the Project tab where the Sheets group is located.
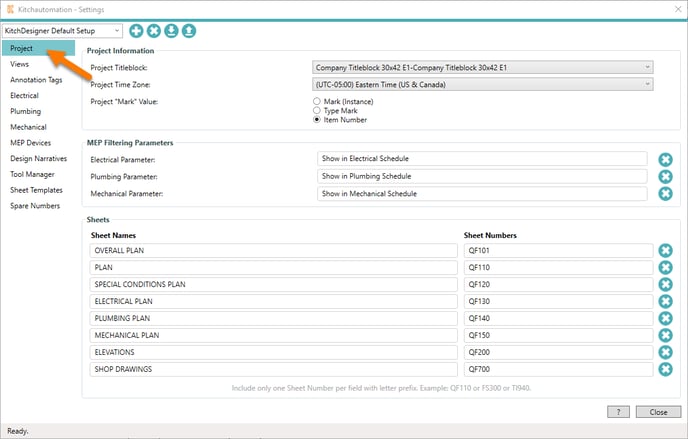
2.1- Sheet Names & Sheet Numbers
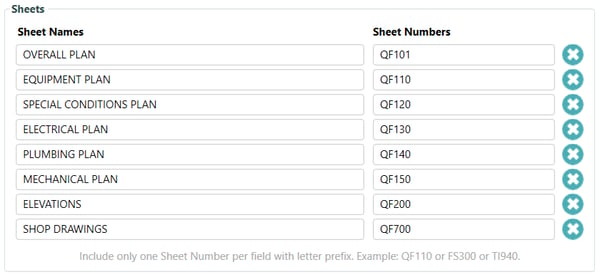
Specify your default sheet names and sheet numbers here.
Use the ![]() to remove the values of the Sheet Name and Sheet Number.
to remove the values of the Sheet Name and Sheet Number.
These can be changed later inside the Sheet Creator tool on Step 2.
The sheet numbers are just the first number in the sequence, the Sheet Creator will not create duplicate sheet numbers so it will always search for the next available sheet number in the sequence. If QF110 is already taken, it will use QF111.
The Reset button ![]() in the Sheet Creator will also reset the sheet numbers to the values located here in the Settings.
in the Sheet Creator will also reset the sheet numbers to the values located here in the Settings.
3. Sheet Templates

The Sheet Templates tab is where you can to specify the views, legends, details, schedules, notes, and any other sheet elements that you would like to place on your new sheets.
The Sheet Templates tab is the identical to Step 1 of the Sheet Creator.
3.1- Sheet Template Files
Each Sheet Template file can include a maximum of (8) sheet types in (3) sheet sizes for a total of (24) unique sheets.
Sheet Template files can be named, imported, and exported.
Sheet Template files are binded to KitchDesigner Settings files, so be aware that when exporting and importing you will also be exporting and importing the full KitchDesigner Settings file with the Sheet Template file.
![]() Export - Name your Sheet Template file and save it to your hard drive.
Export - Name your Sheet Template file and save it to your hard drive.
![]() Import - Share your Sheet Template file or use it on a different project
Import - Share your Sheet Template file or use it on a different project
3.2- Saving Sheet Templates to a Revit Project
When you save your Revit project file, your current Sheet Template settings will also be saved to your Revit project file.
This is also true for the KitchDesigner Settings files.
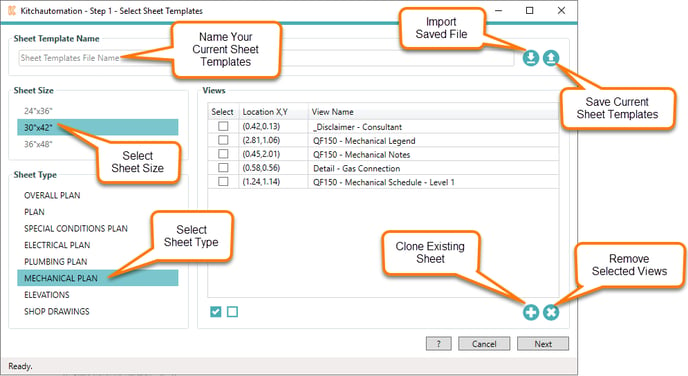
3.3- Sheet Size
To select a sheet size, first load a title block family of the same sheet size into your current project and then the size of the title block can be selected.
The Sheet Creator can only create one size of sheet at a time.
3.4- Sheet Type
There are (8) sheet types that can be used in combination with the (3) sheet sizes.
To rename the sheet types, see the Settings - Sheet Names & Sheet Numbers section.
Select a sheet type and sheet size to configure each sheet template.
Use as many sheet types and sheet sizes as necessary, you do not have to use them all.
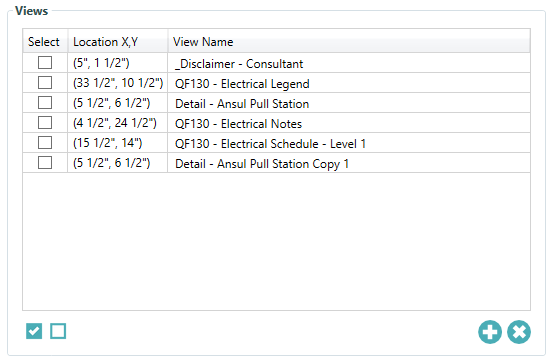
3.5- Views
Sheet Templates provide location information for each view added to a sheet template. When the Sheet Templates are used to create new sheets, the views are placed in the same location.
Views consist of all sheet elements in Revit such as:
- Floor plan views
- Elevation views
- Section views
- Schedules
- Legends
- Drafting views
- 3D views
3.6- Adding Views
The Sheet Creator works by cloning existing sheets in your current Revit project.
![]() To add all views from an existing sheet, click the Add Sheet Views (Clone Sheet) button and select a sheet.
To add all views from an existing sheet, click the Add Sheet Views (Clone Sheet) button and select a sheet.
Select one or more sheets and click  .
.
 Every view on the sheets you select will be added to your sheet template along with each view's location on its respective sheet.
Views that typically cannot be placed on multiple sheets in Revit without errors will still be placed. They will be Duplicated Without Detailing and renamed with a "Copy 1" suffix.
For example: If you had a floor plan view named "First Floor Equipment Plan", it would be named "First Floor Equipment Plan Copy 1" on the newly created sheets.
3.7- Locations
Locations are displayed in inches similar to a coordinate plane.
[0,0] is the bottom left corner.
X is the horizontal distance from the bottom left corner.
Y is the vertical distance from the bottom left corner.
3.8- Removing Views
![]() To remove a view from the active Sheet Template, select the checkbox next to the view you want to remove and click the Remove View button.
To remove a view from the active Sheet Template, select the checkbox next to the view you want to remove and click the Remove View button.
4. Using the Sheet Creator Tool

Click on the Sheet Creator button.
4.1- Step 1 - Select Sheet Templates
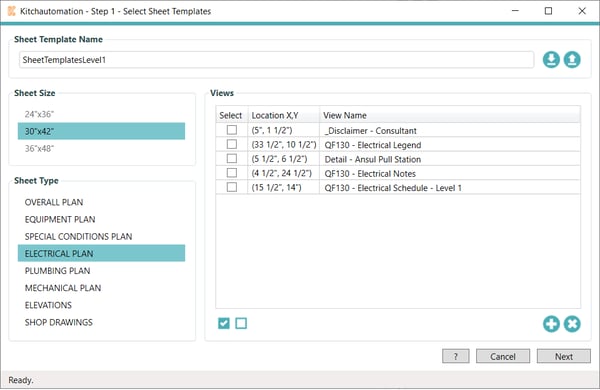
Step 1 is identical to the Sheet Templates tab in Settings.
See the Sheet Templates section.
Once your Sheet Templates are specified, click the  button.
4.2- Step 2 - Create Sheets
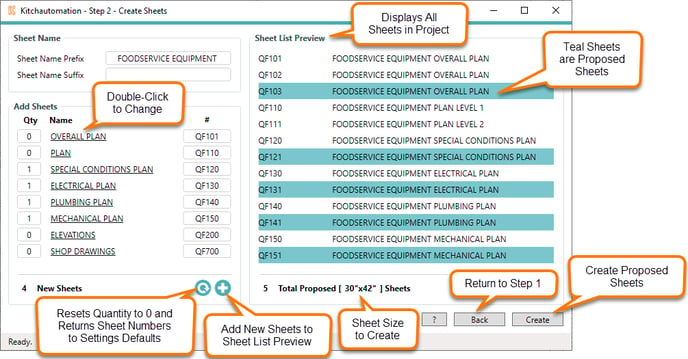
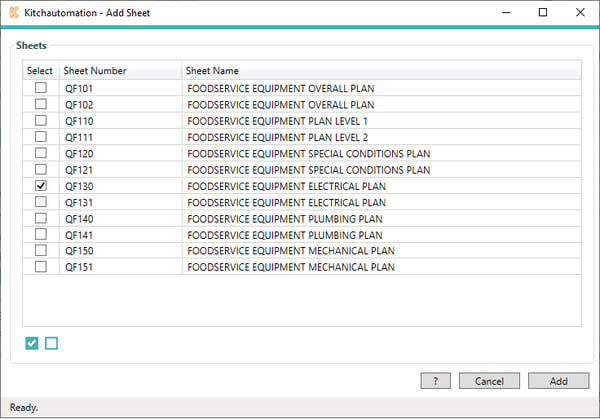
Step 2 of the process is the Create Sheets window. To create new sheets, first add the New Sheets that you want to create to the Sheet List Preview as Proposed Sheets and then press  .
.
The Proposed Sheets will be created using the Sheet Templates that you specified in Step 1.
4.3- Sheet Name
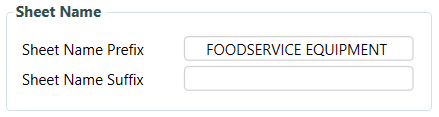
In the Sheet Name group you can add a prefix or suffix to your sheet names.
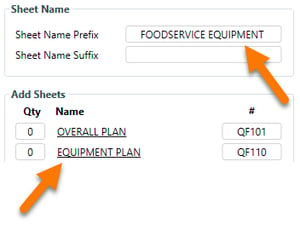
If your prefix contains "Equipment" and your Sheet Name includes "Equipment", the duplicated "Equipment" will be removed when the sheet is added to the Sheet List Preview.
4.4- Add Sheets
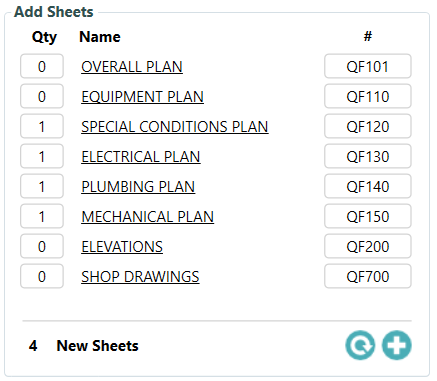
4.5- Quantity
Specify the number of sheets of each type you want to create.
4.6- Renaming Sheets
Rename the sheets by double-clicking on the sheet name.
This will also change the sheet names in the Settings - Sheet Names & Sheet Numbers section.
4.7- Sheet Number
Specify the first sheet number of the sequence for each sheet type.
The Sheet List Preview cannot contain duplicate sheet numbers so if a sheet number is already used, the sheet number will be enumerated by 1 before being placed in the Sheet List Preview.
For example, if you added a new electrical plan with sheet number QF130 and QF130 was already used, the sheet number will be changed to QF131 in the Sheet List Preview.

4.8- New Sheets Quantity
The total number of New Sheets is shown at the bottom of the Add Sheets group.
4.9- Reset Sheet Numbers
![]() The Reset button will change all quantities to 0 and change the sheet numbers to the default sheet numbers located in Settings.
The Reset button will change all quantities to 0 and change the sheet numbers to the default sheet numbers located in Settings.
4.10- Add Sheets to Sheet List Preview as Proposed Sheets
![]() The Add button will move the New Sheets to the Sheet List Preview as Proposed Sheets.
The Add button will move the New Sheets to the Sheet List Preview as Proposed Sheets.
Nothing has been created in Revit yet at this point so you could Exit and start over.
Sheet List Preview
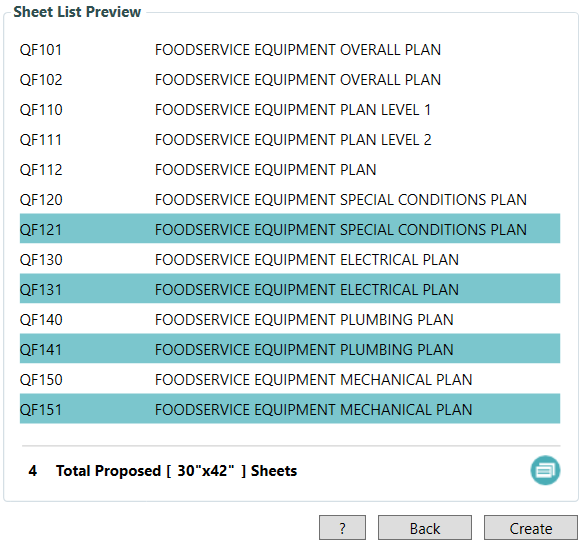
The Sheet List Preview is a handy reference that displays all of the sheets in your Revit project:
- Existing sheets in your Revit project are shown with a white background.
- When New Sheets are added as Proposed Sheets they are shown with a teal background.
At the bottom of the Sheet List Preview is the Total Proposed Sheets and selected sheet size.
Duplicate sheet numbers are not possible, instead the sheet number will be incremented by one until an open sheet number is found.
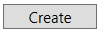 To create new sheets based on the Total Proposed Sheets in the Sheet List Preview, click the Create button.
If you do not specify Sheet Templates, all sheets will be created as empty sheets without views. This technique can be used to create placeholders.
4.11-Returning to Step 1
![]() Click the Sheet Templates button to return to Step 1 or click the
Click the Sheet Templates button to return to Step 1 or click the  button.
5. United States National CAD Standards(NCS) Sheet Naming
If you were following the United State National CAD Standards then your Sheet Numbers must start with QF and could be something like this:
Overall Plan - QF101
Equipment Plan - QF110
Special Conditions Plan - QF120
Electrical Plan - QF130
Plumbing Plan - QF140
Mechanical Plan - QF150
Elevations - QF201
Shop Drawings - QF701
If you would like to learn more about the NCS as it relates to foodservice please check out Kitchautomation Academy Lesson 2.