
The Settings tool allows foodservice designers from all backgrounds to customize KitchDesigner to fit their existing standards and workflows. Settings are saved to Revit project files when Revit is saved.
Each of the Settings tabs have been separated into their own user manual.
All of the sections start with Settings Files - Saving, Importing, and Exporting.
Table of Contents
- Settings Files - Saving, Importing, and Exporting
1.1- Managing your Settings file
1.1.1- Missing Settings Elements
1.2- Saving Settings to a Revit Project - Project Settings
2.1- Project Information
2.2- MEP Filtering Parameters
2.2.1- Filtering Schedules with Project Parameters
2.3- Sheets
1. Settings Files - Saving, Importing, and Exporting

To begin click on the Settings button.
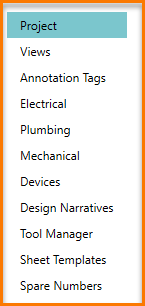
On the left side of the window is your navigation menu, you can click on the vertical list of topics to open a specific Settings tab.
Each tab contains a subset of settings that are used by one of the many KitchDesigner ribbon tools.
The Settings button opens to the Project tab.
1.1- Managing your Settings file
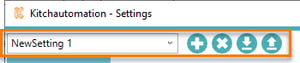
At the top of the Settings window is the Settings Toolbar. This contains the Settings file name and (4) buttons to help you manage your Settings file.
There are occasions where changes in KitchDesigner Settings may need to be distributed to a team of users or you may just want save a backup, in these occasions you can use the Settings toolbar to export settings to other users that can then import them.
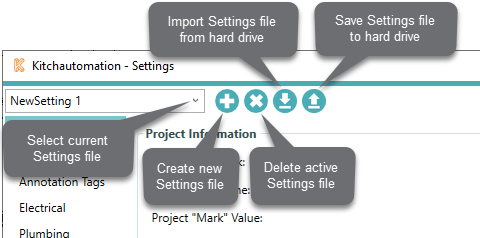
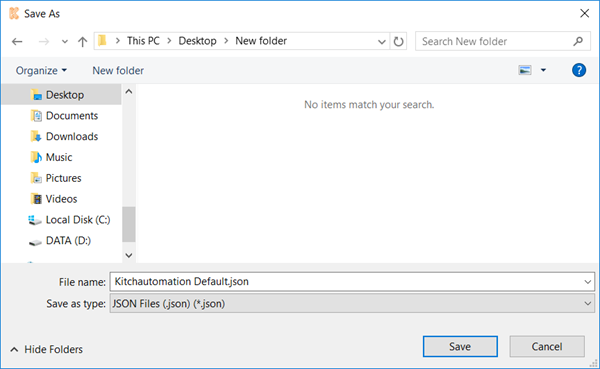
![]() Export Settings files as JSON files and save them to your hard drive.
Export Settings files as JSON files and save them to your hard drive.
![]()
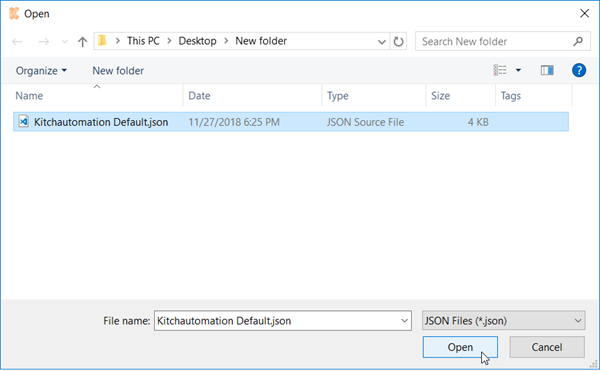
Import Settings files by selecting them using the file browser.
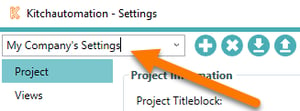
Settings files can also be renamed by clicking on the text to reveal a cursor.
1.1.1- Missing Settings Elements
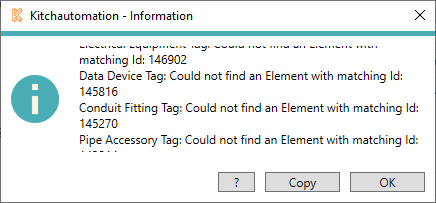
Many of the settings are just links to Revit families and elements in your Revit project, if you import a Settings file into a Revit project that does not also contain these families then those links will be broken and you will receive a Error Message that explains which families were missing. You can copy this list to your clipboard using the Copy button.
1.2- Saving Settings to a Revit Project
A key feature of Settings is that when a Revit project is saved, the active Settings file is also saved to the Revit project file at the same time. This essentially binds the KitchDesigner settings to the Revit project file after each Save.
If the same Revit file is opened by another user on a different computer, all the settings will be just as they were when the Revit project was last saved.
In context of a Revit template file, once you have configured your company settings all you need to do is save your Revit template file and your Settings will also be saved. Any future user of this template will have their Settings pre-configured for their use without ever having to open Settings.
This works great for new projects but for all of your existing projects you will still need to use the Import and Export Settings buttons on the Settings toolbar.
2. Project Settings
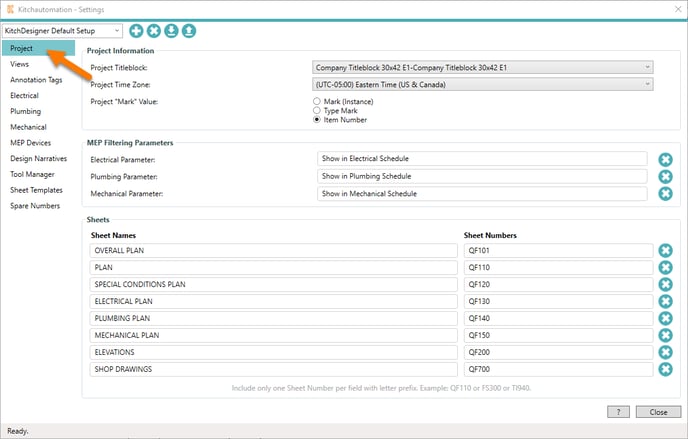
The Project Settings is used to hold project-specific information.
2.1- Project Information

Project Titleblock:
The Project Titleblock setting is a dropdown that displays all of your Revit title block families loaded into your project. Select a title block family to be used by the Sheet Creator when creating new sheets.
Project Time Zone:
The Project Time Zone setting is used by the Design Narratives tool as a point of reference so it should not be changed after Snapshots or Design Narratives have been created.
Project “Mark” Value:
The Project “Mark” Value refers to the equipment numbering parameter used in your Specialty Equipment families. It is used by several KitchDesigner tools.
KitchDesigner supports (3) methods of numbering: Mark(Instance), Type Mark, and Item Number.
The Mark parameter is a Revit system parameter that is commonly used for family numbering and tagging and is Kitchautomation's recommendation. Revit system parameters are in every family and cannot be deleted so you never have to worry about adding it like shared parameters.
- Mark(Instance) refers to the Mark parameter which is an instance parameter. This is also the default setting in KitchDesigner.
- Type Mark is another Revit system parameter. It is similar to the Mark parameter but instead of being an instance parameter, it is a type parameter.
- The Item Number parameter is a shared parameter that is part of the FCSI Shared Parameters.
2.2- MEP Filtering Parameters

MEP Filtering Parameters is a KitchDesigner feature used to limit some of the families that can receive Electrical, Plumbing, or Mechanical Rough-Ins & Connection Points.
They are also used to limit the same families from appearing in Design Narratives.
To set up and access the built-in filtering, create a project parameter for your equipment families and specify this parameter in these MEP Filtering Parameters.
The KitchDesigner default parameter names are:
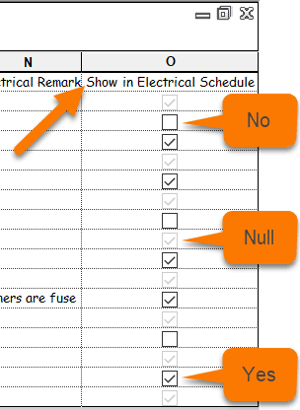
- Electrical - "Show in Electrical Schedule"
- Plumbing - "Show in Plumbing Schedule"
- Mechanical - "Show in Mechanical Schedule"
Here is how it works, add a Yes/No project parameter to your equipment families and place that same parameter in the KitchDesigner MEP Filtering Parameters.
Once you have the project parameter created, you can then uncheck this parameter for each family that you do not want to receive rough-ins or connection points from the Add Rough-In and Add Connection Point tools. For example, when the equipment is existing and not new, it doesn't need a new set of MEP rough-ins or MEP connection points.
2.2.1- Filtering Schedules with Project Parameters
You can also include these parameters in your schedules and use them to filter specific equipment out of your schedules.
Create a Filter in your schedule like this:
"Show in Electrical Schedule" does not equal No
"Show in Electrical Schedule" equals Yes is problematic due to the default state of the Yes/No project parameters in Revit which is null, not Yes. (grayed out Yes/No parameters evaluate to null).
To learn more about schedules and the MEP Filtering Parameters, check out our free tutorial Kitchautomation Tutorial 10 - Create MEP Schedules
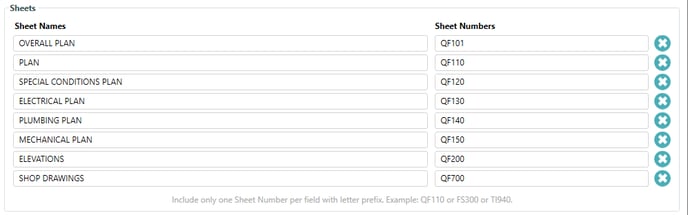
2.3- Sheets
Sheets settings are used by the Sheet Creator tool and the Create|Place MEP Views tool.
Sheet Names:
Sheet names are provided by default but can be renamed. Each of these Sheet Names will be passed to the Sheet Creator tool where you can also edit them.
Sheet Numbers:
Sheet numbers are used by the Sheet Creator tool as the default value for each sheet type. The Sheet Creator tool will automatically increment each Sheet Number by 1 so these numbers should represent the first sheet number in a series.