
This tool converts Revit parameters to Industry Shared Parameters. It defaults to all of the placed families in the current Revit model and has two options: Add all loaded families in the current model or add families from your hard drive.
Table of Contents
- Video User Manual
- Definitions
- Summary
- Using the Parameter Mapper tool
4.1- Tips for Creating Parameters Mappings
4.2- Creating a Parameter Mapping
4.3- Saving Parameter Mappings
4.4- Deleting Parameters Mappings - Processing Revit Families
5.1- Tips for Processing Revit Families
5.2- Processing Placed Families
5.3- Processing Loaded Families
5.4- Processing Hard Drive Families
1. Video User Manual
2. Definitions
Placed Families - Specialty Equipment families that have a family instance in a floor plan view and can be scheduled.
Loaded Families - Specialty Equipment families that have been loaded into the Revit project and are visible in the Project Browser but have not been placed in a floor plan view.
Hard Drive Families - A folder of Specialty Equipment families that are located on your hard drive
Industry Standard Parameters (ISPs) - The KitchDesigner equivalent to the FCSI Shared Parameters used to maintain compatibility with the FCSI Shared Parameters but also to allow flexibility for KitchDesigner to expand the list of parameters. These parameters are used by foodservice designers around the globe and are open to anybody to use, download them here: Industry Shared Parameters List
GUID - A global unique identifier used by Revit shared parameters to differentiate parameters that have the same name. The GUID of the shared parameters is the key to linked the family parameters to the project parameters; when the GUID does not match then the data will not move from the Revit family to the Revit project. Parameters with the same name and data type as ISPs, but with a different GUID are considering incorrect or broken shared parameters and result in missing data in your Revit schedules.
- If Item Number is broken, those families will not show up in your Equipment Schedule.
- If MEP parameters are broken, those parameters will not show up in your MEP schedules for the families that contain the broken parameters.
Most KitchDesigner tools require the use of the Industry Shared Parameters and almost all of the foodservice equipment industry builds their content using the Industry Shared Parameters.
Check out the Kitchautomation Academy Lesson 10 - Create MEP Schedules to learn how to creating MEP schedules using the Industry Shared Parameters. You can learn everything you need to know about the technical side of setting up the Industry Shared Parameters in your Revit template including their history and purpose.
3. Summary
The Parameter Mapper is a tool that allows existing Revit users who have not been using the Industry Shared Parameters to migrate their Revit family databases and existing Revit projects back to the Industry Shared Parameters. The Industry Shared Parameters are also known as the Industry Standard Parameters.
Also, this tool can be used to fix families that have incorrect shared parameters. You can run the tool in just a couple minutes on all of the families in your model and it will find and fix the incorrect shared parameters and skip over all of the families that do not contain the incorrect shared parameters.
This tool can be used on families located in three different places:
- Families PLACED in your current Revit project
- Families LOADED into your current project
- A database of families on your HARD DRIVE.

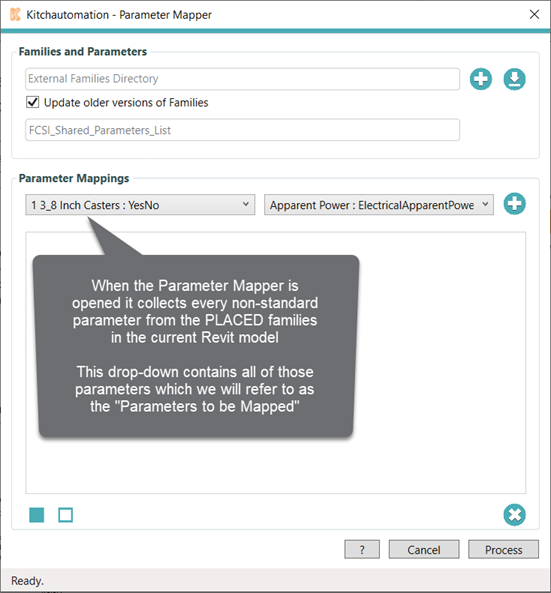
When the Parameter Mapper is clicked, the first thing it does is load in all of the family parameters from the PLACED families in your current project.
From here you can extend the Parameter Mapper to also include all of the family parameters from the LOADED families in your current project.
Or you can choose to include a folder from your hard drive and include all of those families and their parameters.
Regardless of which families you include, the goal is the same. Create Parameter Mappings from your non-standard parameters and map them to their correct Industry Standard Parameter counterpart. Then when you press Process, all of the PLACED families and any other families you decide to include will have their parameters replaced with FCSI Shared Parameters based on the Parameter Mappings you have created. Also all parameter values of the same data type will be passed to the Industry Standard Parameter. If a Cold Water Size parameter with 1/2" is being replaced, the 1/2" will be passed to the new parameter.
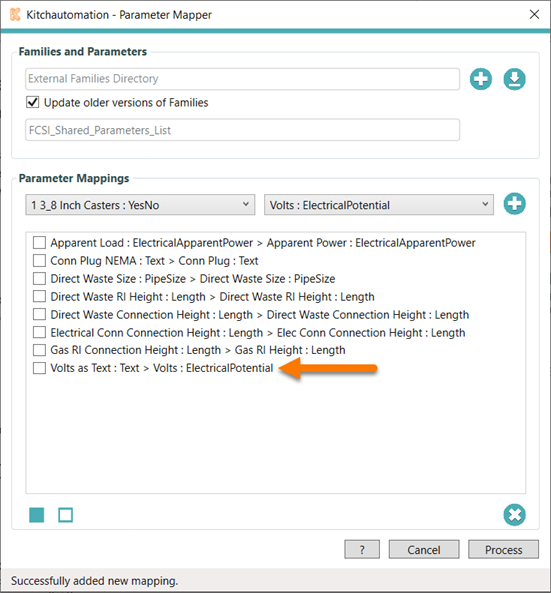
Text parameters can also be converted to other data types such as Numbers, Integers, Electrical Potential, Pipe Size, and many more but unparseable text cannot be converted to a number-type data field such as converting 120/208 to an Integer. If a Volts as Text parameter with 120/208 is being replaced, the 120/208 will not be passed to the new parameter.
All of the parameter mappings are saved to your Revit project file when you press Save in Revit so the next time you open the Parameter Mapper all of your mappings will be available to use again.
4. Using the Parameter Mapper tool

Click the Parameter Mapper button.
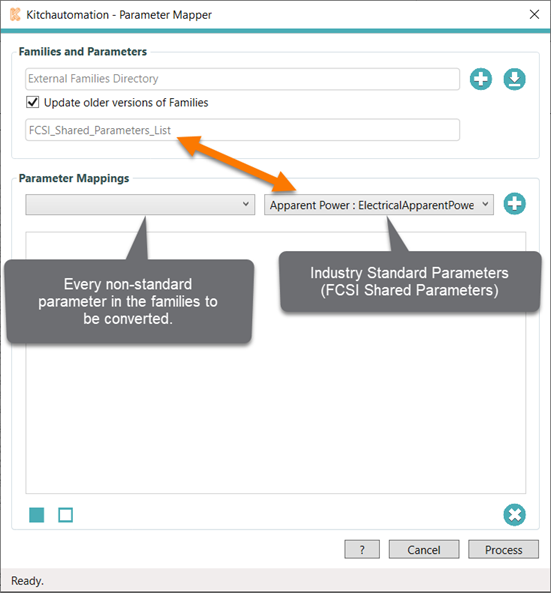
If you do not have a single family placed in your Revit project then the Parameter Mapper will look like this:
Place some families in your floor plan views and the open the Parameter Mapper again and you will see the left drop-down populated with parameters like this:
4.1- Tips for Creating Parameter Mappings
Before we begin, here are some tips to help you when you start creating parameter mappings.
- Each parameter is followed by it's data type and is formatted like this parameter : data type
- The Industry Standard Parameters have been removed from the Parameters to be Mapped drop-down, if you see a parameter that looks identical to an ISP then it must have a different GUID than the ISPs so it should be mapped to the correct ISP.
- Each Parameter to be Mapped can only be mapped to a single ISP so once the parameter is mapped it will be removed from the Parameters to be Mapped. This means the list will get smaller as you create each parameter mapping allowing you to easily see which parameters still need to be mapped.
- It is impossible for duplicates to appear in either drop-down list, if you see a duplicate in the Parameters to be Mapped then they must have different GUIDs and both should be mapped.
- When Revit is saved the parameter mappings are saved to the Revit project file so they will be here when you open Revit the next time.
- The ISPs cannot be changed, they are hard-coded into the software.
4.2- Creating a Parameter Mapping
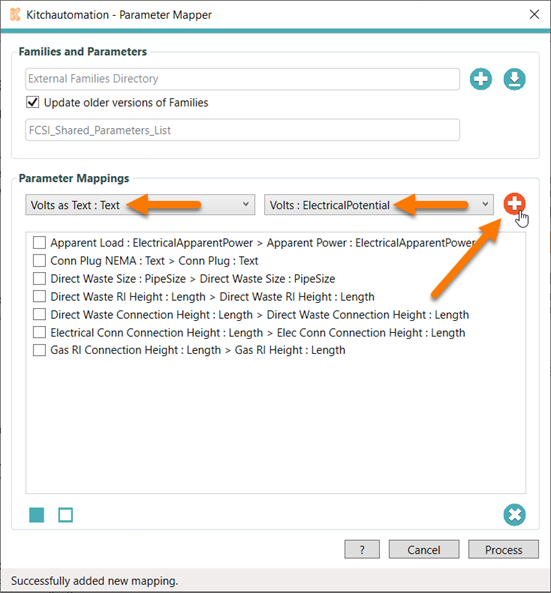
- Select a non-standard Parameter to be Mapped from the left drop-down.
- Select the destination Industry Standard Parameter from the right drop-down.
- Click the + button to create the parameter mapping.
- (Optional) Use the Filter button to reduce the list of Parameters to be Mapped (Coming Soon)
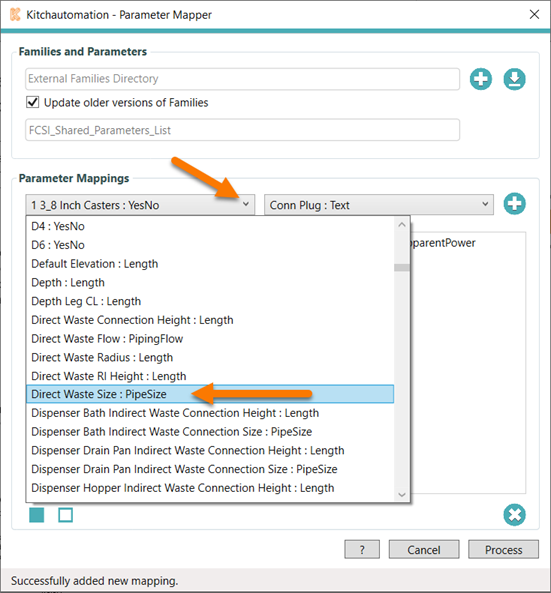
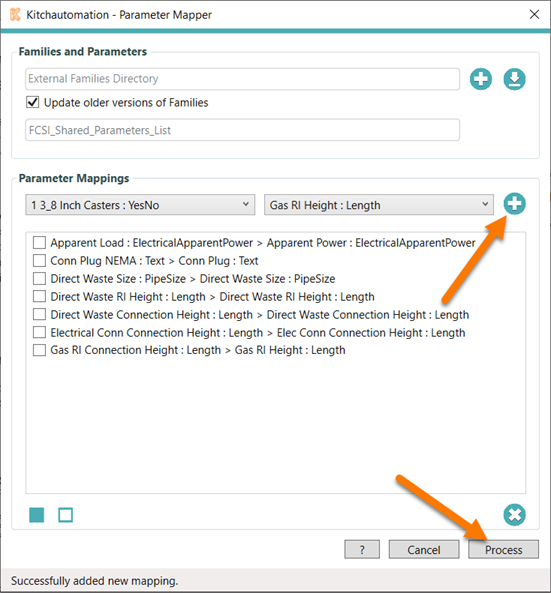
Select a Parameter to be Mapped from the drop-down on the left.
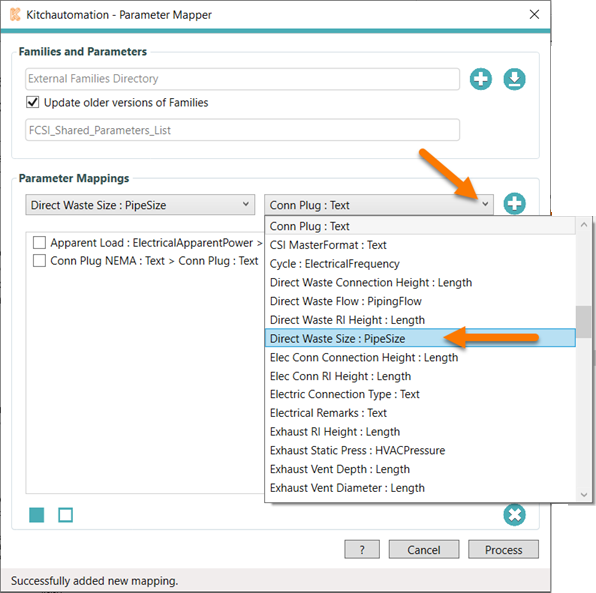
Next select the ISP that you want to map your Parameter to be Mapped from the drop-down list on the right side.

Once you have selected both parameters to create the parameter mapping you are ready to click the + button to create the parameter mapping.
The parameter mapping will be created and placed in the section below.
Once you finish creating your parameter mappings you are ready to process the changes.
4.3- Saving Parameter Mappings
After you create your parameter mappings, all you need to do to save them to your Revit project is Save your Revit file.
This will save the parameter mappings to your Revit project file where they can be used by anybody who opens the Revit project file. If you create the parameter mappings in your Revit template and Save, then they could be used on every future project created from that Revit template.
4.4- Deleting Parameter Mappings
To remove parameter mappings that you created, select them and click the delete button.
This button will delete all of the selected parameter mappings.
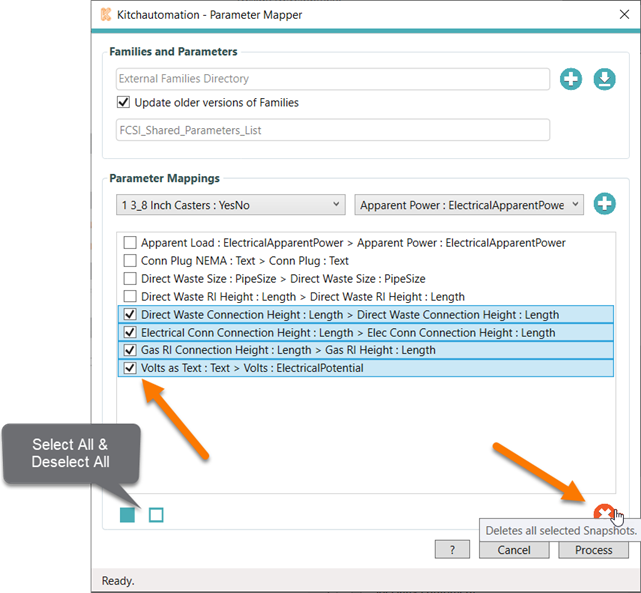
Be careful, you may not be able to get these back if you cannot recreate them and you delete them.
5. Processing Revit Families
5.1- Tips for Processing Revit Families
- The Parameter Mapper will skip families that do not contain any of the Parameters to be Mapped.
- The Update older versions of Families checkbox is only necessary when processing families from your HARD DRIVE, if you unchecked this and your HARD DRIVE families are from an older version of Revit than the one you are currently in then those families will be skipped.
- It is not possible to only process some of the PLACED or LOADED families, by default all of the PLACED families are processed every time and the LOADED families can be added all at once or not at all. If you only want to process certain families, we recommend using the HARD DRIVE families method.
- Parameters to be Mapped will be replaced by the ISPs when parameter mapping contains same data type.
- When the data type is different, a new ISP will be added and the original Parameter to be Mapped will be left untouched.
- The resulting ISPs will mimic the Parameter to be Mapped in terms of whether it creates a Type or Instance parameter.
5.2- Processing Placed Families
By default the Parameter Mapper loads all of the PLACED family's parameters in when it is opened.
This means it also processes all of the PLACED families in your current Revit model by default.
To begin click the Process button.
A progress bar will start and each of the PLACED families will be opened, then the parameter mappings will be applied, then closed and on to the next.
The Parameter Mapper takes approx 1 minute for every 5 families processed, or about 12 seconds a family.
Once the processing is completed, the Parameter Mapper will close and return you to the project.
5.3- Processing Loaded Families
The Parameter Mapper can also be used on all of the families LOADED into your active Revit project.
The parameter mappings do not need to be changed based on the families being processed, you can also use parameter mappings created from the PLACED families to Process the LOADED families.
It is also possible to create new parameter mappings from the LOADED families before you process them.
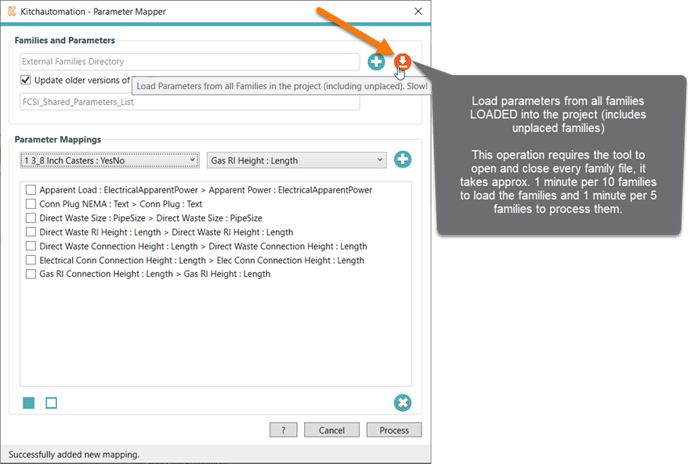
To begin, click the Loaded Family button in the top right corner.
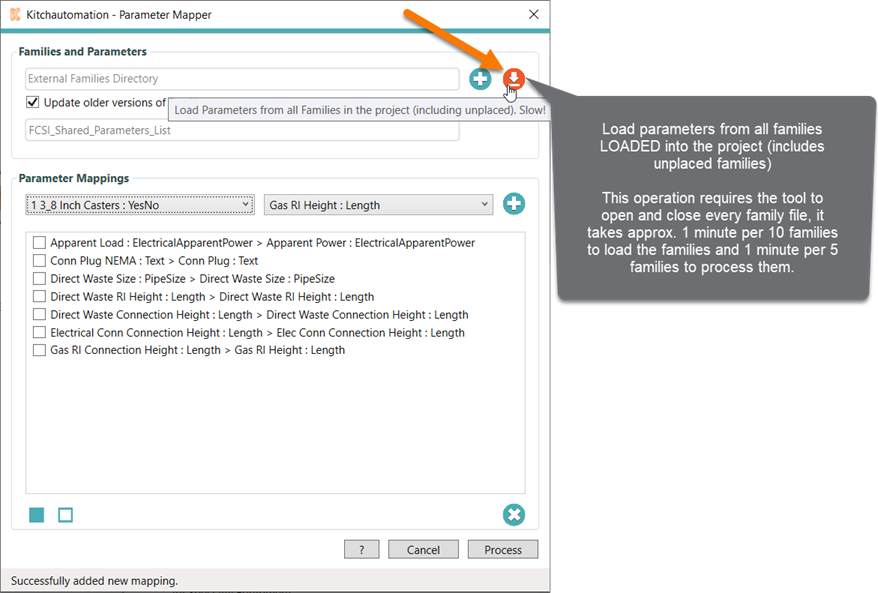
The Parameter Mapper will open each LOADED family, take inventory of every parameter, then close the family and move to the next one.
Once complete, every parameter from the LOADED families will be combined with the rest of the Parameters to be Mapped and can be used to create additional parameter mappings.
This time when you click Process it will process all of the PLACED families and all of the LOADED families.
5.4- Processing Hard Drive Families
The Parameter Mapper can also be used on all of the families in a folder on your HARD DRIVE.
The parameter mappings do not need to be changed based on the families being processed, you can also use parameter mappings created from the PLACED families or the LOADED families to Process the HARD DRIVE families.
It is also possible to create new parameter mappings from the HARD DRIVE families before you process them.
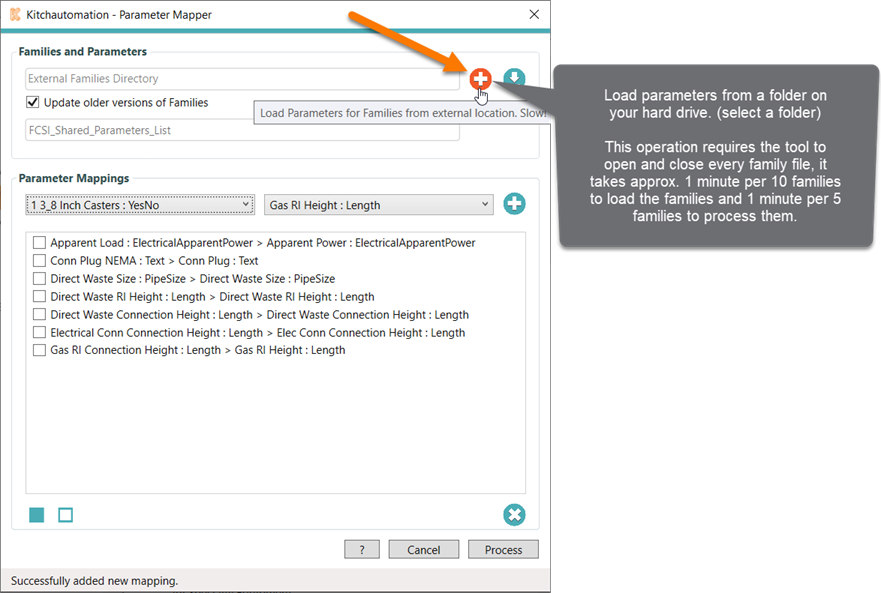
To begin, click the Load from Hard Drive button in the top right corner that looks like a + sign.
The Parameter Mapper will open each HARD DRIVE family, take inventory of every parameter, then close the family and move to the next one.
Once complete, every parameter from the HARD DRIVE families will be combined with the rest of the Parameters to be Mapped and can be used to create additional parameter mappings.
This time when you click Process it will process all of the PLACED families and all of the HARD DRIVE families. The HARD DRIVE families will not be saved over, a new folder named "Processed Families" will be created inside the specified folder and all of the newly created families will be placed in the "Processed Families" folder.