Create Snapshots of your model the compare two Snapshots to create a Design Narrative. A Design Narrative change log can then be created and exported to Microsoft Word. Here it can be further edited and then shared as a Word document.
Table of Contents
- Getting Started Video
- FAQ
2.1- What is a Design Narrative?
2.2- What is a Snapshot?
2.3- How does it work?
2.4- What will it show?
2.5- What if i don't have a "before" Snapshot? - Using the Design Narratives tool
3.1- Snapshots
3.2- Design Narratives
1. Getting Started Video
2. Design Narratives FAQ
2.1- What is a Design Narrative?
A Design Narrative is a written log listing all of the changes that occurred in your Revit model from the first Snapshot to the second Snapshot.
2.2- What is a Snapshot?
A Snapshot is a snapshot in time of your Revit model that includes the foodservice equipment parameters and their FCSI shared parameter values. You can only have 1 Revit project file open when creating a Snapshot.
2.3- How does it work?
First you must only have 1 Revit project open. Next create a snapshot, then go and make changes to your model, then create a second snapshot. Select both snapshots and Create a Design Narrative. Export to Word. Share.
2.4- What does it contain?
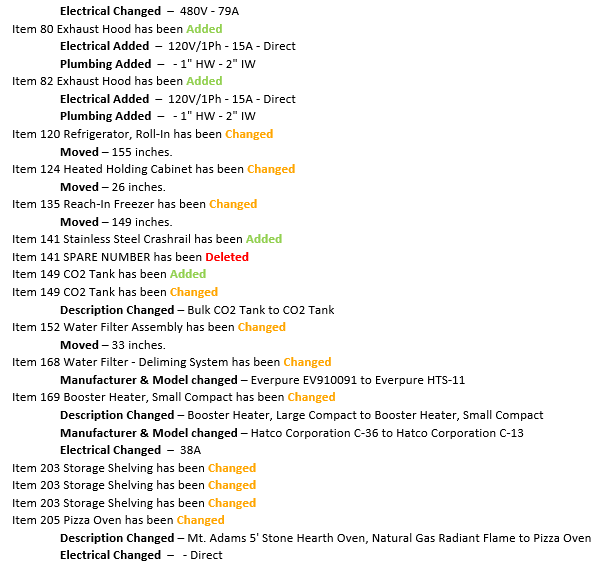
- It shows when specialty equipment is added, deleted, changed and/or moved.
- It shows when the Manufacturer, Model, Description, and/or Item Number changed.
- It shows when MEP parameters have been added, deleted or changed.
- It shows when mechanical, electrical, or plumbing rough-ins have been added, deleted, changed, or moved.
2.5- What if i don't have a "before" Snapshot?
Snapshots can be exported and imported using the Import Snapshot and Export Snapshot buttons. Open an older version of your model that you saved before the change, create a Snapshot, then use the Export Snapshot button, then go to your newer model and use the Import Snapshot button. It will now be saved in your new model. Now you will be able to select your 2 Snapshots to Create a Design Narrative.
3. Using the Design Narratives Tool

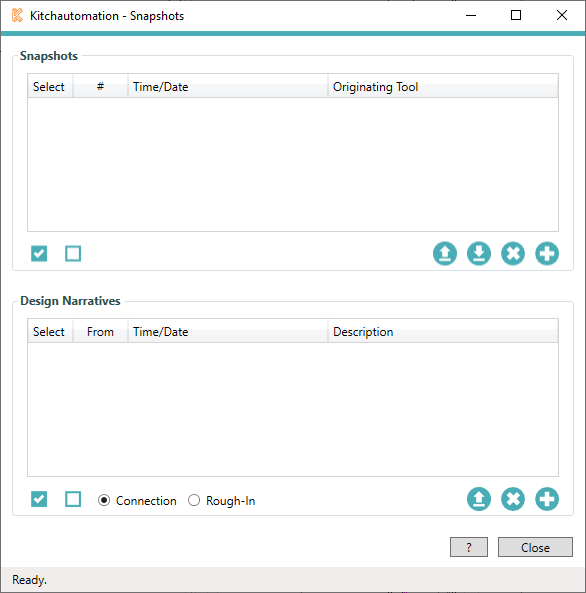
Click on the Design Narratives button.

3.1- Snapshots
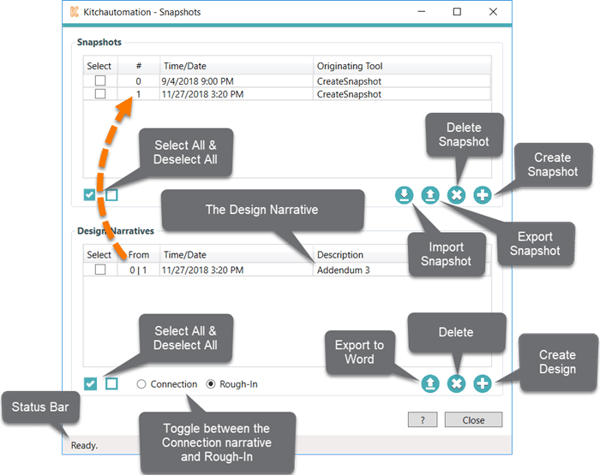
![]() Create Snapshot – Use this button to create manually create a new Snapshot. Use this button at major milestones in your design process or before any change to use as the start point for your Design Narratives.
Create Snapshot – Use this button to create manually create a new Snapshot. Use this button at major milestones in your design process or before any change to use as the start point for your Design Narratives.
![]() Delete Snapshot – Use this button to permanently remove the selected Snapshot(s). Always be careful when deleting and if you accidently click this button you can use the Undo command after closing the window.
Delete Snapshot – Use this button to permanently remove the selected Snapshot(s). Always be careful when deleting and if you accidently click this button you can use the Undo command after closing the window.
![]() Export Snapshot – Use this button to download a Snapshot to your hard drive. This can be used to retrieve a “before” Snapshot from an older Revit model.
Export Snapshot – Use this button to download a Snapshot to your hard drive. This can be used to retrieve a “before” Snapshot from an older Revit model.
![]()
Import Snapshot – Use this button to upload a Snapshot that you have previously exported. This can be used to import a Snapshot that has been exporting from an older Revit model. Combine the imported Snapshot with an existing Snapshot to create a Design Narrative from two different Revit files, an old file and a new file.
3.2- Design Narratives
![]() Create Design Narrative – Use this button to create a new Design Narrative from two selected Snapshots.
Create Design Narrative – Use this button to create a new Design Narrative from two selected Snapshots.
![]() Delete Design Narrative – Use this button to permanently remove the selected Snapshot(s). Always be careful when deleting and if you accidently click this button you can use the Undo command after closing the window.
Delete Design Narrative – Use this button to permanently remove the selected Snapshot(s). Always be careful when deleting and if you accidently click this button you can use the Undo command after closing the window.
![]() Export Design Narrative to Microsoft Word – Use this button to open and view your selected Design Narrative in Microsoft Word.
Export Design Narrative to Microsoft Word – Use this button to open and view your selected Design Narrative in Microsoft Word.

Design Narratives are color-coded, organized by Item Number, and based off the Industry Standard Parameters. They record changes to Manufacturer, Model, Description, Electrical, Plumbing, Mechanical, and when equipment has been moved.
 Connection vs Rough-In – There are two types of narratives that can be exported to Microsoft Word from the same Design Narrative, the Connection narrative and the Rough-In narrative.
Connection narratives only check Specialty Equipment families.
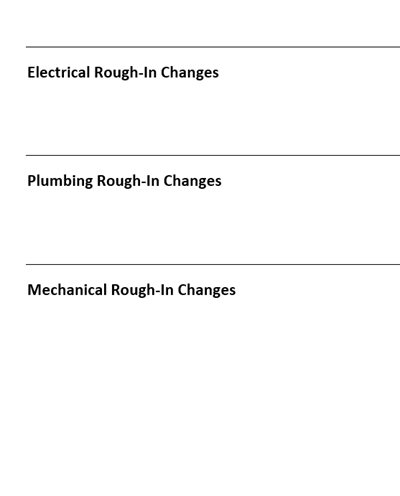
Rough-In narratives check Specialty Equipment families and MEP families such as Electrical Fixtures, Plumbing Fixtures, and Mechanical Equipment. These changes are shown in two places, they are shown indented in the All Changes section and they are listed out separately in their own sections for Electrical, Plumbing, and Mechanical.

The full list of Revit family categories that are checked for the Rough-In narrative includes:
- Electrical Fixtures
- Electrical Equipment
- Conduit Fittings
- Data Devices
- Plumbing Fixtures
- Pipe Fittings
- Pipe Accessories
- Mechanical Equipment
- Duct Fittings

